

January 19, 2020 | "Timeless"
- Elizabeth Delos Reyes
- Jan 21, 2020
- 5 min read
Updated: Jan 29, 2020
This week my team started production on our project and I couldn't have been more excited. There were a lot of new things to consider after our pitch meeting with The Mill mentors. My team and I carefully planned out our film shoots, our tasks, and our plan of action for the next few weeks.
Location, Location, Location
After our first pitch meeting, the biggest things we had to reconsider was the location for our commercial because it didn't necessarily match our original tagline and vision of "The Car of Tomorrow, Today." We looked into many different locations around Savannah that were more modern. Some of those locations include the Jepson Museum, the Gryphon, the Hive SCAD dorms, some areas around the SCAD MOA, Bradley Hall, and the Grove in City Market. I went around Savannah getting these photos and recording test videos to see if we could find a new location. (Pictures below were taken by me)


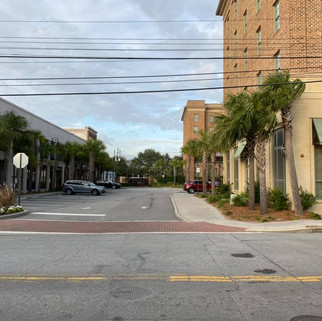


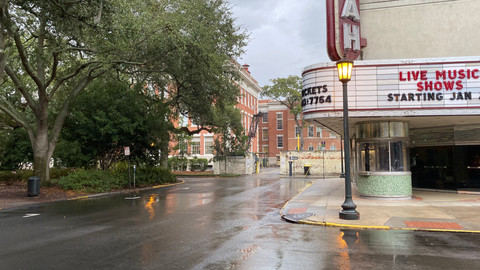
Although we found these other locations, we still loved our location at the Savannah Theatre. Therefore, we decided to change our tagline to "Timeless" in order to keep our location and advertise our car as classic in any generation. Once we made this decision, I coordinated our meetings and our film shoots throughout the weekend. (These photos below were taken by Diana)


On Friday, January 17, we woke up extra early to get a first round of background plates for our commercial. We used the Mini Ursa Black Magic camera to shoot our footage as well as a Samsung 360 Camera to get our HDR images. I made a little vlog of our adventure from Friday's shoot...
After looking at our footage from Friday, we saw that a lot of it was overexposed and unusable. The HDR images we shot weren't adequate so as a team we all decided to re-shoot over the weekend. The next day we ran out to the theater to try to film again but we ran into many problems such as traffic, tourist, and light change. So, we decided to wake up extra early on Sunday to film again. This time we made sure to use the Cannon 5D Mark III to check color balance, exposure, and to shoot our HDRs correctly. I wouldn't say that the last few days of shooting were a total failure because although we used up a lot of time shooting (and getting nothing) we felt more comfortable this time around and worked faster because we learned what NOT to do. Here's another mini vlog of our second and third shoot from the weekend...
Shot Composition
While preparing for our shoot, we tried finding good car commercial references for our shot composition. I found these references helpful to achieve what we were looking for. For our first shot, we searched for a camera that we wanted to mimic. I found these references from car commercials to show the team. We really loved the shot of this car at :39 and tried to recreate that for our camera animation in shot one.
I found a second reference video that really helped with the shot composition for our second and third shot. The team and I also liked how the camera pans looked in this reference as well and we tried to mimic them.
Animatic Version 2
We had to make many shot composition changes to our project in order to make it more cinematic and professional. With the help of our references and further composition studying, we revised our previs. I go into contact with an animator who could help us come up with more dynamic camera angles for our first shot. I also re-animated and updated all the camera movements for the second and third shot.
EDR
Look Development
HDR
Initially, we used a 360 camera to shoot our HDR but we found some issues regarding the different exposures and stitching the image together, so we decided to reshoot our HDR the more traditional way and assembling it in Photoshop. Here were our first attempts with the 360 camera.


After re-shooting, we were able to get our final HDR assembled for our scene. It was overcast when we shot our final HDR, which was beneficial for us especially when it came to maintaining consistent lighting for our background plate. We shot 7 different exposures with the Samsung 360 camera by changing the exposure manually instead of using the automatic "HDR" function on the 360 camera. I created the in HDR with those images in photoshop. The second image is a screenshot of the HDR hypershade. I added a clamp to keep all the max values below to avoid clipping. I was responsible for creating the HDR.


EDR
Light Rig
Here's a screenshot of our light rig. It contains a ground, four shader balls (grey clay, black plastic, white plastic, and chrome), a Macbeth Color checker cube, and our HD plugged into an aiskydome. I was responsible for setting up the light rig and for setting up all the files for our look development shader balls.


EDR
Car References
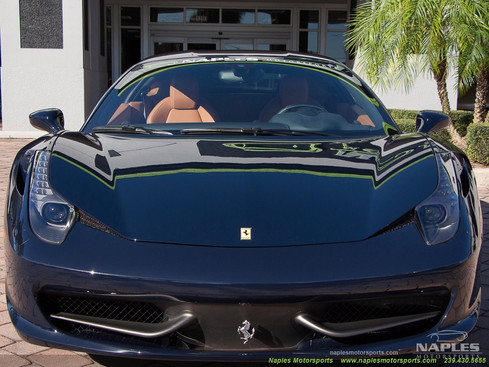
This is the Ferrari style we were going for when shading and texturing our car.


Tunnel Progress
Here's some test renders of our futuristic light tunnel and a beginning of what our lighting direction may be for this shot. There's lights mimicking our references that used florescent lighting and we played with volumetrics to create interest and depth as well. Lorena is responsible for all of shot 1's progress thus far.


Materials & Textures
Here are all the materials we used to create the look of our Ferrari. Each render has a ball shaded with each material needed for our car along with what we referenced it from. I am responsible for creating the chrome, car paint, dark metal, rim metal, black plastic, tinted glass, and the mirror shaders. I also put together this video of our lighting team's shaders and textures.
Our shader quilt that contains all the materials and textures we're using for our project. It includes all the car materials and the tunnel materials.


Car Turntable
Our entire lighting team is responsible for applying our assigned shaders to our car and rendering this turntable which in includes our HDR and light rig.
Troubleshooting
We did, however, run into a few problems with the Lorena's glass shaders and our light rig. At first, we were using a sphere geometry as a "sky dome" with our HDR mapped on a surface shader along with a spotlight acting as the sunlight. We found that this negatively affected many of our shaders on the lights of our car by making it appear black. Using a aiSkydome actually fixed this problem that we had and the colors of our glass appeared again.


Final Thoughts
I will admit, this last week was really rough on my team and me because of weather limitations, time constraints, and other external factors, but we really powered through to get our project rolling and I'm actually proud to show how far we've gotten. It's awesome to use this project as an opportunity to become friends with my team and learn more about the type of work they do as well. It really has expanded my knowledge and helped me grow as an artist.