

January 26, 2020 | Perspective
- Elizabeth Delos Reyes

- Jan 26, 2020
- 3 min read
Updated: Jan 29, 2020
After our second check-in on Wednesday, my team and I worked diligently to move forward in our production. We all had our individual tasks that we focused on for this week such as camera tracking, camera matching, lighting, modeling, and FX. Here's what I have worked on so far.
Perspective
One of the tasks that I took on this week was finding the camera perspective of the camera in shot 2. In order to do this, I took a screenshot of our background plate (which is a static camera shot), put it in Photoshop, and painted perspective lines on the street. We did have a shot of a 6 inch cube from our integration kit to help me find the camera angles. I mapped that image to an image plane in my Maya camera, scaled up the cube to real world scale, increased the depth of the image plane, and I did my best to match my CG cube to the one from my image.


After finding the perspective, I imported our Ferrari and I found that it looked "too small." In order to fix this problem, I looked up the exact dimensions of a Ferrari 458 Italia (length: 178.2in, width: 76.3in, height: 47.8in) and made sure to match the size to our car model in Maya. To check scale, I also looked up the dimensions of a standard car parking spot (length: 18ft, width: 9ft) and the dimensions of a Chevrolet Equinox (length: 188in, width: 73in, height: 66in), which we have reference of driving by the theater. I made cubes using those dimensions and matching them to our reference in Maya.


I found that the camera perspective was correct for the most part if were assuming that the road is completely flat and there's no inconsistencies in the road. This, however, is highly unlikely therefore I had to readjust our model to fit. The solution I found was to scale up the Ferrari to 1.05cm and that seemed to be more believable in size.
Reflections
The next task that I took on was to figure out how to mimic the reflections in the mirror and chrome detailing and the reflections on the windows of the theater. In our video references we saw that the cars did reflect off the theater windows and mirrors.
I then modeled the ticket booth and the side of the theater to match the dimensions and look of our references. I used these reference photos (taken by Diana) in order to accurately model, texture, and shade the theater.


Here are the models that I made for the theater. The material I used for the top detailing is a mirror material and for the window reflections I used a glass shader. I then repeated the process with the cube when placing the geometry in the same camera perspective. I mapped the perspective lines of the cylindrical ticket booth and the windows of the theater.


Here are some test renders of the reflections.


After comp testing a few of the AOVs, I found that using the specular in-direct AOV the most effective to put on the reflections of the windows because it only renders the car reflections. So, I shuffled that out, lowered the gain, and blurred the reflections to create the subtle car reflections on the window. I also included renders of the shadow to comp into the scene to make the car look more "real".

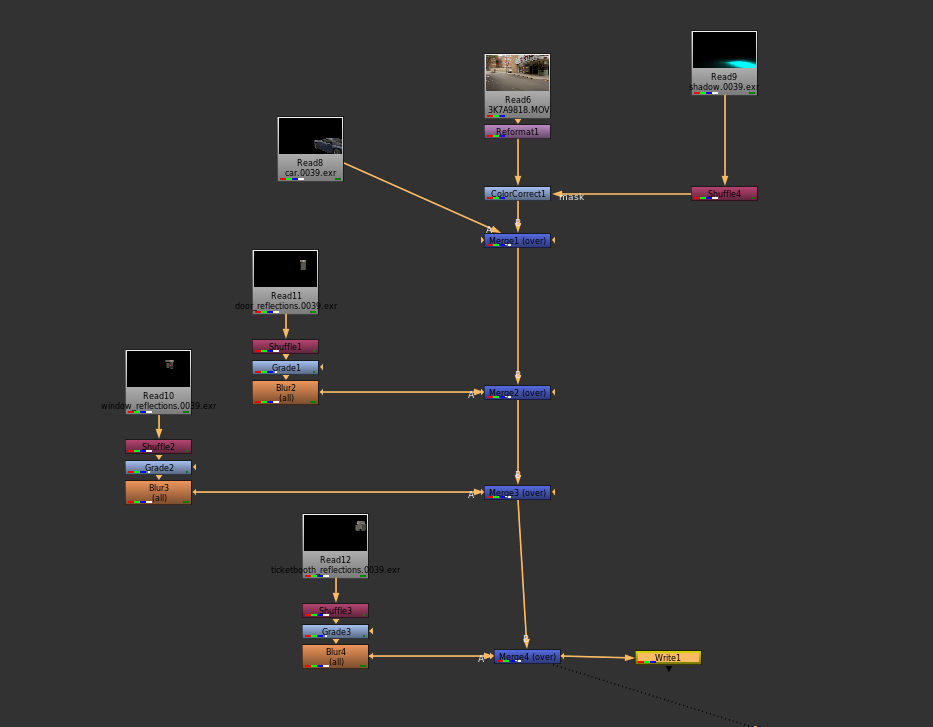
Here is the test comp of those reflections... (sidenote: I thought it looked extra cool now that our car has lights!)
Improved Car Model (it has lights now yay!)
We noticed something very wrong with our car from last week and realized that there were no lights! (THE HORROR!) So, I initiated the first light test for our car headlights and break lights. I put an emission on the LEDs material, point lights on the headlights, and spotlights to emit light forward on the ground. For the back lights, I put point lights and an area light for the break light in the middle. This seemed effective. Here is a turntable of our car with the lights and all the materials with a time change from day to night. (disclaimer: I think there's a problem in the render where the left headlights turns off or it is possibly animated, but I will make sure to fix that for next week.)
Previs Version 3
Here's our newest version of our project's previs with thus far.
Final Thoughts
Figuring out how to get the reflections in the windows to work was pretty challenging considering all the specific measurements and little details that it took to get it as accurate as possible. I think I found a pretty effective way to get those, and now we just have to do that with the addition of the portal/lightning FX. I'm really excited how well this is all turning out and how much progress our team is making.


Comments